
7 Ways to Knit a Left-leaning Decrease [Tutorial]
- Susanna

- Sep 20, 2019
- 5 min read
![7 Ways to Knit a Left-leaning Decrease [TUTORIAL]](https://static.wixstatic.com/media/2a6e85_3668e923c97645eba6c4075b7ed4f9ec~mv2.png/v1/fill/w_600,h_900,al_c,q_90,enc_avif,quality_auto/2a6e85_3668e923c97645eba6c4075b7ed4f9ec~mv2.png)
When it comes to knitting a right-leaning decrease, the choice is a no-brainer: knit two together (K2tog). Are there even other alternatives? Not that I've ever heard of.
But what about left-leaning decreases? This is where it gets complicated — there are a myriad of options to choose from! In this tutorial I review seven different methods of knitting a left-leaning decrease and try to find the one that is the best mirror-image counterpart to K2tog.
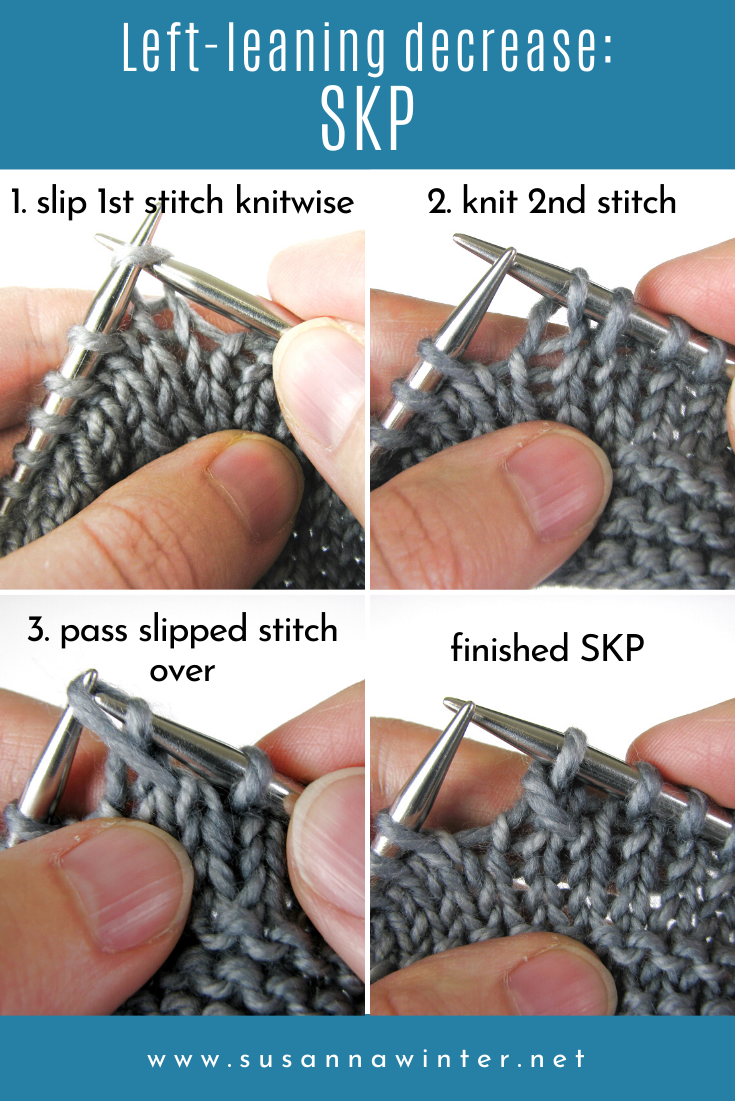
1. Slip One, Knit One, Pass Slipped Stitch Over (sl1, K1, PSSO or SKP)
This is the left-leaning decrease I was first taught and for the longest time I thought it was the only one out there. To work this decrease you slip the first stitch (sl 1), knit the next stitch on the left-hand needle (K1), then grab the stitch that was slipped (now the second on the right-hand needle) with the left needle tip and pass the slipped stitch over (PSSO) the one that was knit.
The motion of slipping the stitch and the pulling it over the next one can stretch the stitch too much, making the decrease quite visible.
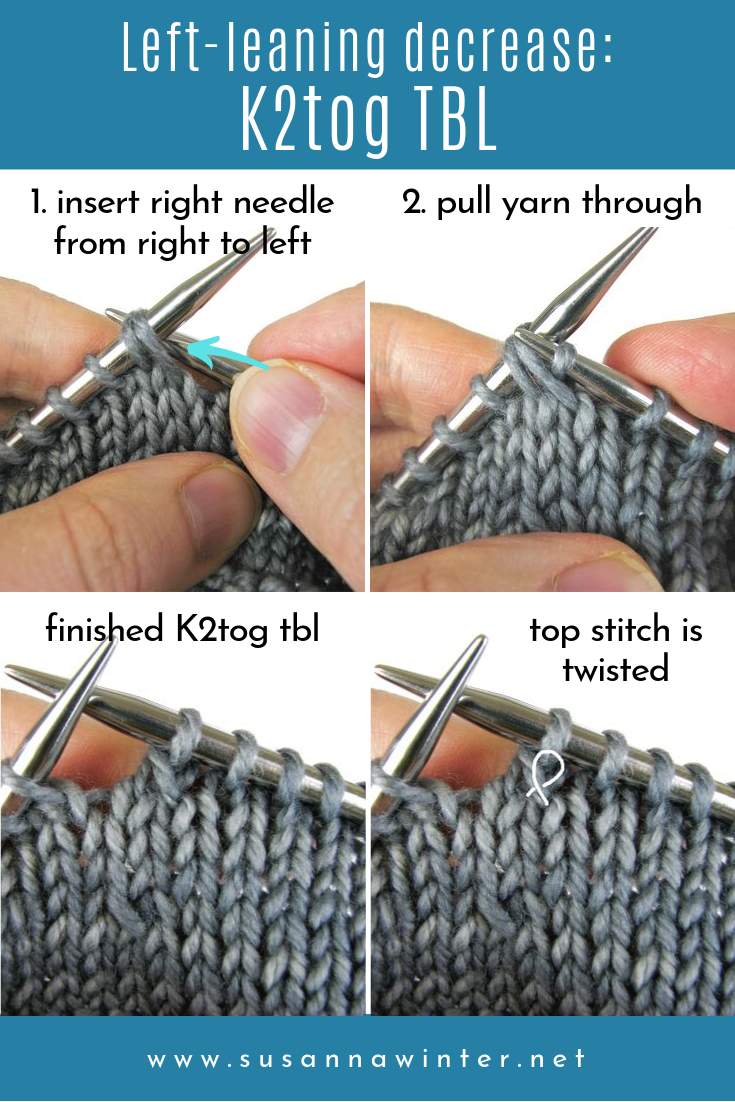
2. Knit Two Together Through the Back Loops (K2tog tbl)
On first glance this decrease might seem to be a better match for K2tog. It is after all the same stitch, only worked in a way that makes the decrease lean to the left. As the name suggests, you knit the first two stitches on the left-hand needle together but going in through the back legs of the stitches, inserting the right-hand needle from right to left. And herein lies the problem: knitting the stitches through the back loops twists the stitches — you can see how the legs of the stitch in front are crossed.
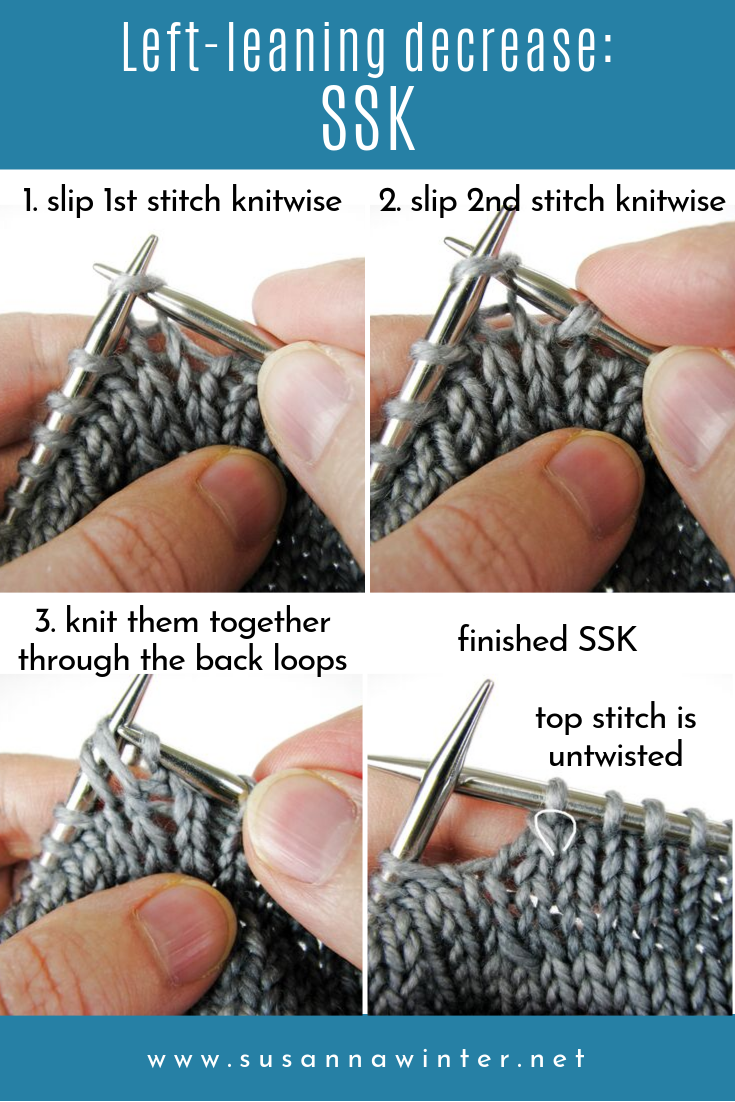
3. Slip, Slip, Knit (SSK)
SSK is sort of a mash-up between SKP and K2tog tbl. To work this decrease you slip the first two stitches knitwise, one at a time, then knit them together through the back loops in this new orientation. (Some instructions tell you to pass the two stitches back to the left-hand needle after slipping them. This is not really necessary since the stitches are already in the right position to be worked together.)
Slipping the stitches knitwise causes them to be twisted whereas knitting them together through the back loops untwists them, returning the stitches to their original, uncrossed orientation.
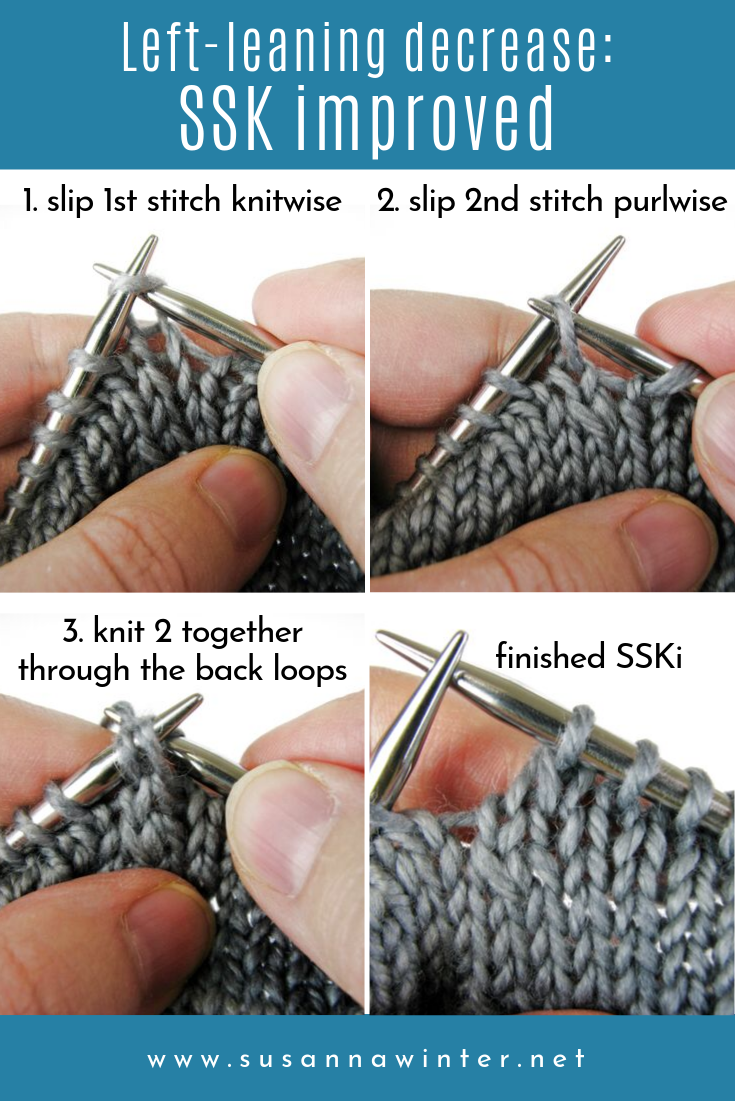
4. Slip, Slip, Knit Improved (SSKi)
This improved version of the SSK is my favorite left-leaning decrease. It can be traced back to Elizabeth Zimmermann (like many of the really cool techniques in knitting) and her daughter Meg Swansen. I always use the SSKi for left-leaning decreases, even if the pattern tells me to do a SKP or a SSK.
There is only one minor difference between SSK and SSKi but many think that the improved version lies a little smoother, making it a better match for K2tog. To work the SSKi you slip the first stitch knitwise (as in the regular SSK), the second stitch purlwise, then knit the two stitches together through the back loops.
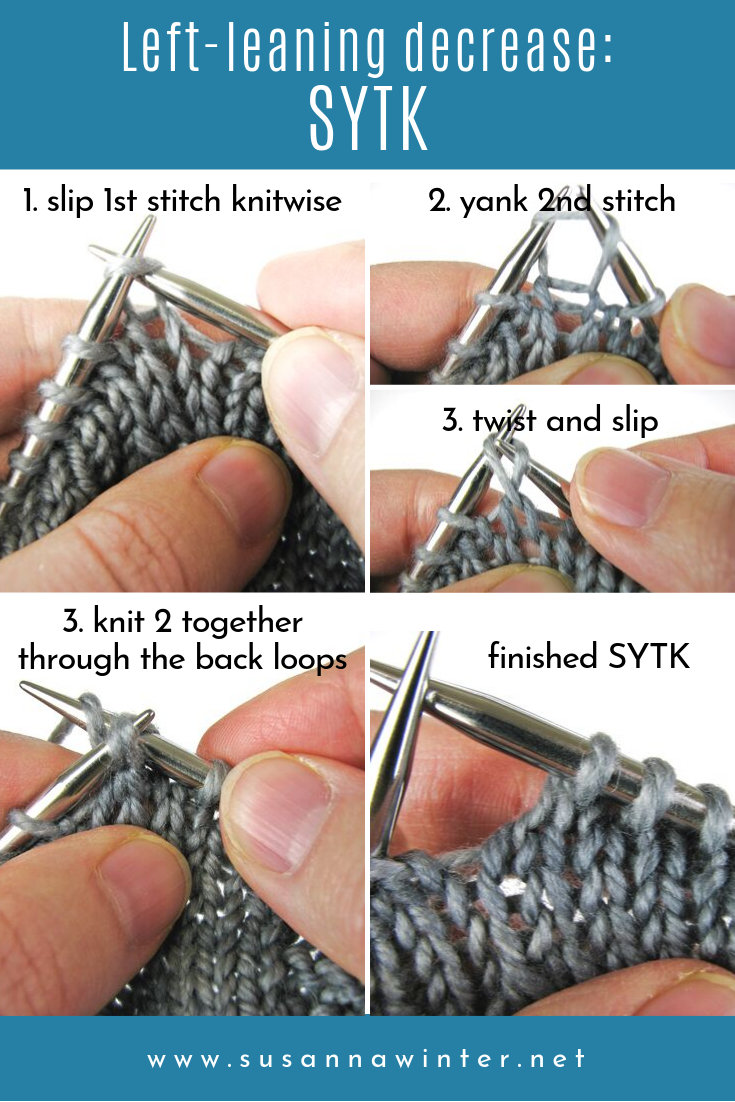
5. Slip, Yank, Twist, Knit (SYTK)
The problem with many of the left-leaning decreases is that slipping and pulling the top-most stitch creates extra slack that makes the decrease look so visible. The next two methods try to tackle this issue.
The first one, the SYTK decrease, comes from the TECHknitting blog. First, slip the first stitch knitwise. Then poke the right needle into the next stitch and pull (or 'yank') on that stitch to remove the slack from the two stitches beside it. After yanking, twist the now-enlarged stitch clockwise by grabbing the back leg from behind with the right needle tip. Slip the stitch in this twisted orientation to the right needle. Finally, knit the two stitches together through the back loops.
By adding a YANK step to SYTK, the excess yarn from the surface stitch is all transferred to the hidden second stitch, and by adding a TWIST step, that excess yarn is prevented from slipping out again.
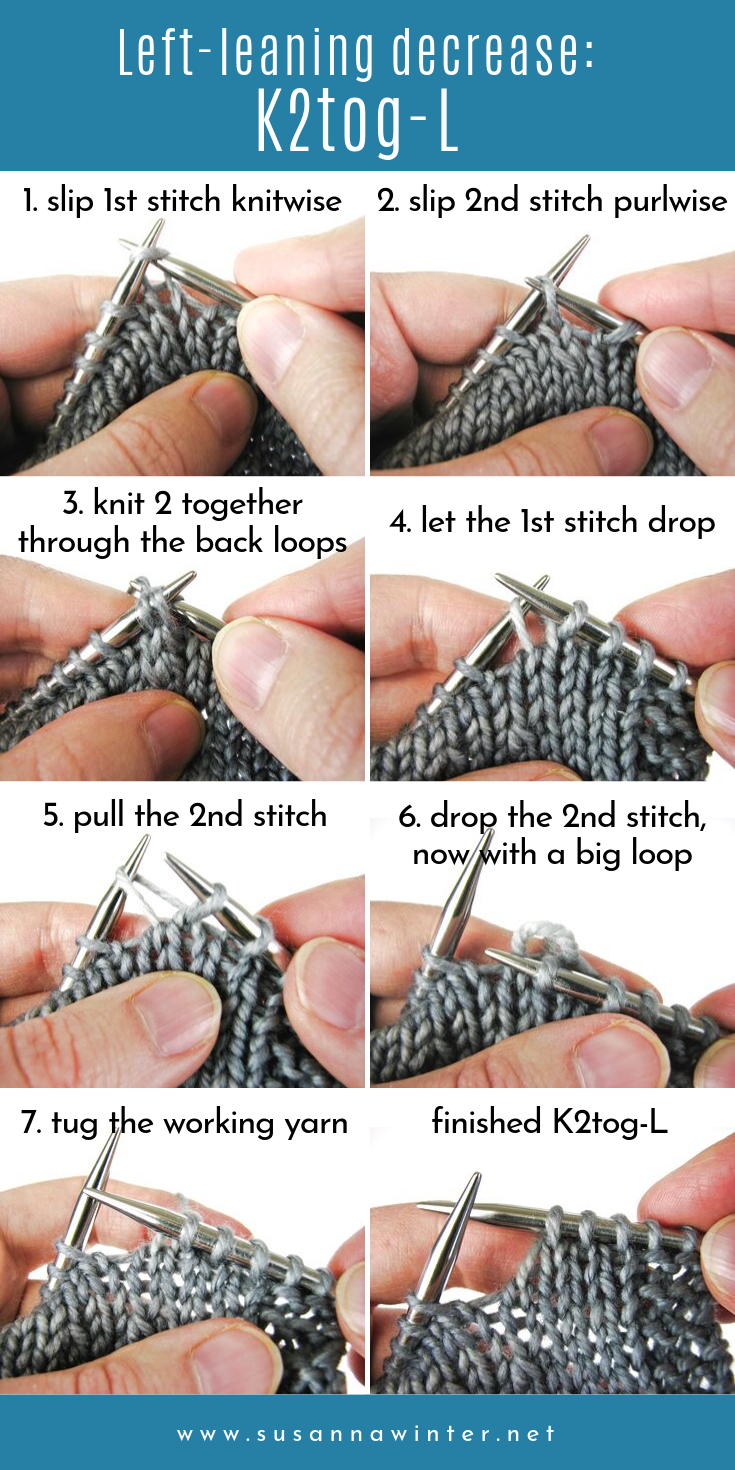
6. Wendy's Left-leaning K2tog (K2tog-L)
The next method was invented by designer and Yarnsub creator Wendy Peterson. The K2tog-L decrease is like an improved version of the SSKi decrease with a couple of extra steps thrown in. SSK improved... improved? I like the sound of that.
To work the K2tog-L start the same as you would for SSKi: slip the first stitch knitwise, the second stitch purlwise and knit the two stitches together through the back loops. Here's the difference: let only the first stitch drop off the left needle.
Pull on the other stitch that's still remaining on the left needle to take off the slack in the surrounding stitches (like with the 'yank' step in SYTK). When you let the stitch fall off the needle, there's a big loop at the back of the work. Finally, pull on your working yarn to make that loop disappear.
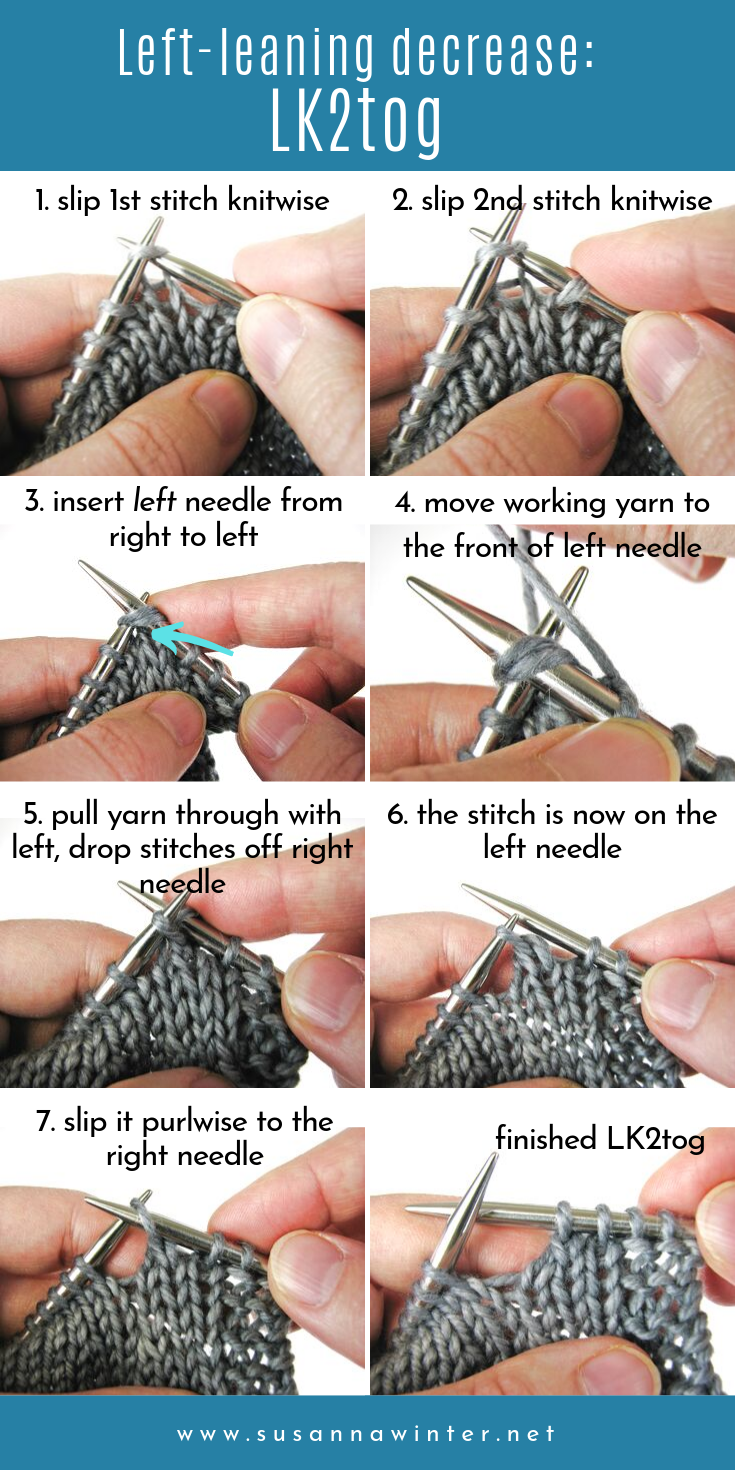
7. La Maison Rililie's Left-leaning K2tog (LK2tog)
So far so confusing? It gets even better. This last decrease was invented by the designer La Maison Rililie, and there's a 21-step photo tutorial for the LK2tog decrease on her blog. Imagine for a while that you're in a mirror universe working stitches off the right needle to the left. This is what you're essentially doing with the LK2tog: decreasing a stitch while going in the opposite direction.
The decrease starts the same way as a regular SSK: slip two stitches, one at a time, knitwise onto the right needle. Then insert the left needle into both of these stitches from right to left — this can be a little awkward — move the working yarn so that you can grab it with the left needle tip, and pull the yarn through. Since you're using the left needle as the working needle, the resulting stitch is now on your left needle. To complete the decrease, slip the stitch purlwise to the right needle.

So what's verdict? What is the best left-leaning counterpart to K2tog. The annoying thing is the easier the decrease, the more visible it is when compared to the K2tog. I can't honestly tell much of a difference between the first five alternatives.
To me, the best matches are the K2tog-L and LK2tog decreases. La Maison Rililie's LK2tog is quite tricky to execute although I bet it gets easier after a bit of practice. I'm so used to doing my trusty SSKi that adding just a couple of extra steps to make it into a Wendy's K2tog-L just might be worth it. It's the right balance of looks, speed, and simplicity.
But what about you — what's your favorite left-leaning decrease? Let me know in the comments below!
Pin this post!


I am intrigued by the La Maison Rillie method but can't figure it out. I wish there was a video for it
Hi Susanna, thankyou, very comprehensive description and instructions of those pesky 'lefts'. I've been doing a K2tog-L for a while now and it's perfect, so much so, they run rings around my right-leaning K2tog's. I'm probably pulling out too much slack on the second stitch with the lefties - they do look great though. Was actually looking for a way to make my K2tog's look a little less slack 😁
Will work on making my lefties not quite so tight instead.
Thanks again
Sarah