
Lifted, Invisible, and Median Increases in Knitting: What's the Difference?
- Susanna

- Feb 23, 2024
- 8 min read
In this blog post I examine three less-commonly known pairs of mirrored increases used in knitting: lifted, invisible, and median increases. These increase methods are close relatives to each other: they share some commonalities but also subtle differences.
Unlike strand increases (commonly known as M1L and M1R) which are done by working into the strand between stitches, these three increases are all done by working into a stitch on a row below. Lifted increases are perhaps the most well-known of the bunch but still tend to get mixed up with invisible increases. Many tutorials online use the terms interchangeably when they're in fact not quite the same thing. Median increases are less well known but nevertheless a handy technique to have in your knitting technique repertoire.
Below I'll demonstrate how to knit both left- and right-leaning versions of each increase type, explain their similarities and differences, and when they can and can't be used. By understanding these characteristics you can choose the most suitable increase method for your projects to achieve the desired visual and structural effects.
Lifted Increases
Lifted increases are commonly abbreviated as LLI and RLI depending on the direction of the increase. LLI stands for left-leaning lifted increase while RLI is its right-slanting counterpart, right-leaning lifted increase. Note that the last character in the abbreviation is a capital I for increase, not the number 1.
The oldest source for this increase that I could find is the TECHknitter: in the May 2007 post titled A very nearly invisible increase they illustrate an RLI but not the left-leaning version. The first tutorial to demonstrate both left- and right-leaning versions of the increase comes from the late, great Cat Bordhi. In her August 2007 video for the book New Pathways for Sock Knitters: Book One, she calls them LA-Link and LA-Rink, respectively.
Åsa Tricosa calls this increase type raised increases (make 1 raised) but still abbreviates them with LLI and RLI. The website Knittinghelp.com has a different name and abbreviation: Knit Left Loop (KLL) and Knit Right Loop (KRL). Whatever you call them the technique is still the same.
Lifted increases are so named because the increase is done by lifting the leg of a stitch from the row below and knitting (or purling) into it. The direction of the slant — right-leaning or left-leaning — depends on which leg of the stitch is lifted. In this blog post I'll focus only on the knit versions of these increases. You can find purl versions on YouTube by searching for "lifted purl increase", for example.

To knit a right-leaning lifted increase, lift the right leg of the stitch on the row below (highlighted in blue).
Place it onto the holding needle.
And knit it through the front loop (leading leg).
Then knit the original stitch (red) — I'll call this the base stitch from here on out.

A left-leaning lifted increase is done pretty much the same way but with one important caveat: pay close attention to which one is the base stitch and which one is on the row below.
Knit the base stitch (red). Notice how it's no longer on the top of the stitch column.
Lift the left leg of the stitch one row below (blue) the base stitch — two rows below the stitch you just worked.
Place it onto the holding needle...
And knit it through the back loop (leading leg).

Lifted increases create quite subtle increases that are suitable for projects where a minimal impact on the fabric is desired. They are a great alternative if you tend to get holes in your work when using M1L and M1R increases. Even if you normally don't have this issue, some smooth, round-profile yarns (such as cotton or S-on-S plied yarns) can be pretty ruthless in showing any types of disruptions on the knitted surface.

Lifted increases can be stacked on every other and every row, although the latter tends to leave a larger hole at the spot where the increases begin. They could therefore be a great choice for situations where a rapid, every-row increase rate is needed, such as in rounded sock toes, compound raglans, or when using the contiguous-sleeve method — provided something is done about that initial enlarged stitch.
Invisible Increases
Who came up with this increase type is not recorded in the history books but the earliest reference I could find is in Hellebore, a 2013 Michele Wang pattern for Brooklyn Tweed. Invisible increases are commonly abbreviated as inv-L and inv-R, with the "inv" being an abbreviation for "invisible" and the last letter indicating the direction the increase leans towards. As with lifted increase, the direction of the slant depends on whether it's the left or the right leg of the stitch that's being lifted.
Very often and regardless of experience level, knitters tend to get lifted and invisible increases mixed up. If you look up video tutorials for invisible increases on YouTube, you're most likely to find ones that actually demonstrate lifted increases instead. Et tu, Roxanne?
Unfortunately this perpetuates the myth that lifted and invisible increases are the same thing. They are indeed very similar but with one subtle difference: what to do with the base stitch. Here's the tl;dr version: in lifted increases the base stitch is worked, in invisible increases the base stitch is slipped. Although this difference may seem minor on first glance, it has major ramifications on the way invisible increases can be used in knitting projects.

To knit a right-leaning invisible increase, lift the right leg of the stitch on the row below (blue).
Place it onto the holding needle.
And knit it through the front loop (leading leg).
Then slip the base stitch (red) purlwise from the holding needle to the working needle without knitting it.

To knit a left-leaning invisible increase, slip the base stitch (red) purlwise from needle to needle. Contrary to the situation above with lifted increases, the base stitch is still on top of the stitch column so you don't have to count two rows down for the next step.
Lift the left leg of the stitch from the row below (blue).
Place it onto the holding needle.
And knit it through the back loop (leading leg).

Invisible increases blend into the surrounding stitches pretty imperceptibly: some say they're even more invisible than lifted increases (hence the name). But they're best used sparingly, sprinkling them here and there, because weird things start to happen when you try to stack them in the same position. Like crossing the streams weird.

If you stack invisible increases on every other row, you'll get these stretched out loops that are far from invisible. And here's why: the lifted leg of the stitch from the row below is the same stitch that was slipped on the previous increase row, already making it twice the height compared to the surrounding stitches. Lifting it again makes it three rows high.

And if that wasn't bad enough, things go really bonkers if you try to stack invisible increases on every row. I've worked to the increase position and would now need to lift the right leg of the stitch below… but where is it? Even if I were to find some loop to work into, I'd then need to slip the next stitch (red) which was already slipped on the previous row. Stacking invisible increases on every row would mean that the same stitch gets slipped over and over and over again — it never gets worked! Houston, we have a problem.
Median Increases
Median increases are the least commonly known increase type of the bunch. These increases don't (yet?) have a commonly-used abbreviation that everyone knows them by. They're sometimes referred to as knit 1 below increases, row below increases, or make 1 below (M1B). Don't confuse them with knit 1 below (K1B or k1-b), though. That's a technique used in Fisherman's rib and other tuck stitches.
Median increases first make an appearance in June Hemmons Hiatt's The Principles of Knitting where she calls them understitch increases. A vague reference in this 2011 blog post suggests that the term "median increase" might be included in Montse Stanley's Reader's Digest Knitter's Handbook from the early 1990s (which unfortunately I don't have access to). The best video tutorial demonstrating both left- and right-leaning median increases is by The Chilly Dog but unfortunately she gets them reversed compared to way they're described in Principles of Knitting.
Median increases differ from lifted and invisible increases in that they're worked into the middle of a stitch from the row below. Hence the name: Merriam-Webster defines the adjective median as "being in the middle or in an intermediate position". The direction of the slant the increase leans towards depends on the order in which the stitch below and the base stitch are worked.

To knit a right-leaning median increase, insert the tip of the working needle into the stitch from the row below (blue)...
And knit it.
Then knit the base stitch (red).

For a left-leaning median increase you do these steps in the opposite order. June Hemmons Hiatt warns in PoK that "[t]his is more awkward to do, and would be used only when necessary". The sass.
Knit the base stitch (red) first. Notice how it's no longer on top of the stitch column.
Pivot the working needle so that it points downwards, and insert the tip into the stitch one row below (blue) the base stitch — two rows below the stitch you just worked.
Then knit this stitch.
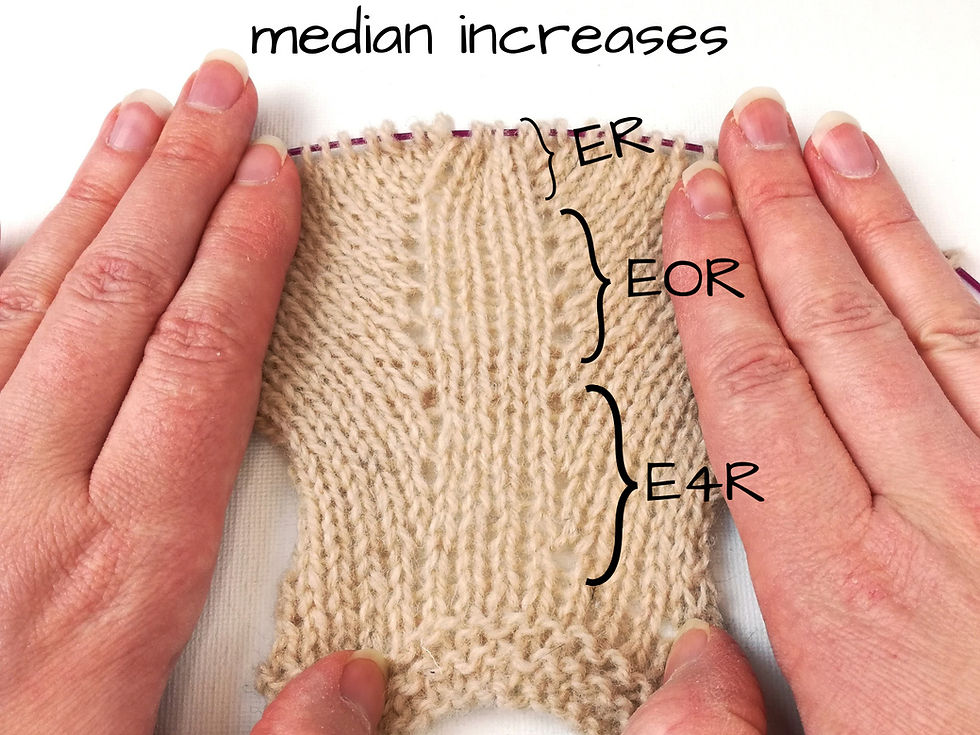
Median increases tend to be more visible and leave a bigger hole in the knitted fabric than lifted or invisible increases. June Hemmons Hiatt writes in Principles of Knitting that they're not unobtrusive and "tend to thicken the fabric below the new stitch" which, if cleverly applied, could be used in a textured stitch pattern.

Median increases can be stacked on every and every other row. In fact, the holes they tend to leave are smaller when worked on every row, making a rather nice line of increases. But I get what JHH says about thickening the fabric: median increases stacked on every row leave a bumpy seam-like ridge on the wrong side of work.

While they're not as invisible as other increase types, you could use median increases for a decorative effect. Consider, for example, inserting both right- and left-leaning increases into the same stitch column. This median double increase (MDI, anyone?) would look nice when used in the raglan seam of a sweater, for example.
In Summary
Comparing these three increase types side by side I'd say that — in terms of invisibility alone — lifted and invisible increases are pretty much on par with each other. Median increases clearly stand out the most. But that's only half the story.

Lifted increases are good all-rounders to be used in practically any situation where an imperceptible increase is wanted. They can be stacked on every other and every row.
Invisible increases are best used sprinkled here and there. The structural issues that stem from slipping stitches outweigh the benefits of invisibility. Stacking invisible increases on every other row is impractical; stacking them on every row is downright impossible.
Median increases tend to be the most visible but this could be used for a decorative effect. They can be stacked on every other and every row but create a bumpy ridge on the wrong side.
If you're craving for even more information on paired increases, take a look at this blog post: 6 Ways to Knit Mirrored Increases. Lifted increases are already featured on that list; invisible and median increases are not. These two posts combined teach you to knit 8 different left- and right-leaning increases — that's 16 increases total!
Pin this post!


![6 Ways to Knit Mirrored Increases [Tutorial]](https://static.wixstatic.com/media/2a6e85_cd6b1a9d936b4590a62c085a522e95fe~mv2.png/v1/fill/w_980,h_1742,al_c,q_90,usm_0.66_1.00_0.01,enc_avif,quality_auto/2a6e85_cd6b1a9d936b4590a62c085a522e95fe~mv2.png)


This is a great explanation of these decreases! I have some further information about all of them for you:
I first knit lifted increases somewhere around the year 2000. My memory is that I learned how to knit both kinds from a Japanese website in english that was linked from somewhere I was reading regularly; this could have been the socknitters email list or maybe the knitters review forums. Anyway, I was using them well before 2007. Alas for disappearing websites.
Also, I’ve just been looking at the increases in my copy of Montse Stanley’s Readers Digest Knitter’s Handbook, and right, left, and double versions of the lifted increase are in there. I have the 2001 edition, but the book…
Thank you so much! I've never heard of "median increase" before. I enjoy reading your blog very, very much. I'm a sucker for learning techniques and I often learn something new from you! Your posts are so educational.