


How to Knit Three-row Double-Yarnover Buttonholes [TUTORIAL]

Updated: May 5

My upcoming knitting pattern Scattershot (launching on May 5th!) is a short, cropped V-neck cardigan with built-in doubleknit buttonbands. For this design I wanted to use vertical buttonholes that are fast and easy to knit, don't interrupt the doubleknit fabric, and are as invisible as possible. The name is a bit of a mouthful: three-row, double-yarnover buttonholes.
The technique is a little mind-bendy at first and there are quite a few steps involved but ultimately these buttonholes are very easy to knit.
What's in a Name?
This buttonhole technique is based on the two-row yarnover buttonhole found in June Hemmons Hiatt's The Principles of Knitting (second edition, page 133)… with a few minor tweaks.
First off, the name. Even though the original is called a two-row yarnover buttonhole, it's actually done over three rows. The hole itself span two rows vertically so I get where the name comes from although as the name for the technique it's a bit misleading.
Second, single yarnover buttonholes are tiny. I wanted something that could accommodate slightly larger buttons so I needed a bigger hole. Two yarnovers back to back get the job done.
Third, in the book there's a step in the technique that (in my opinion) is not needed. I streamlined the instructions, left it out, and the buttonhole functions just as well.
The Three-Row Double-Yarnover Buttonhole
So how is this buttonhole technique done? Here's how it goes.
Row 1 (right side)

Step 1. Work to where the you want the buttonhole to be. Scattershot has 7-stitch doubleknit button bands and I'm making the buttonholes roughly in the middle, 4 stitches in from the edge.

Step 2. Make a double yarnover: wrap the working yarn twice over the needle. Work to the end of the row and turn.
Row 2 (wrong side)

Step 3. Work back until you encounter the double yarnover from the previous row. Here you can see the two wraps next on the left-hand (holding) needle.

Step 4. Next, slip the double yarnover purlwise (that is, without changing stitch orientation), letting the extra wrap drop in the process. Now you've got one long strand on the working needle.
Confused about what knitwise and purlwise mean in the context of slipped stitches? Read this: How Do You Slip a Stitch?

Step 5. Make another double yarnover, then work to the end of the row and turn.
Row 3 (right side)
Rows 1 and 2 were setting up for the trick but Row 3 is where the magic happens!

Step 6. Back on the right side again, work to 1 stitch before the double yarnover.

Step 7. Slip the next stitch knitwise; this changes the stitch orientation. Why? Because we're setting up for a decrease.
Confused about what knitwise and purlwise mean in the context of slipped stitches? Read this: How Do You Slip a Stitch?
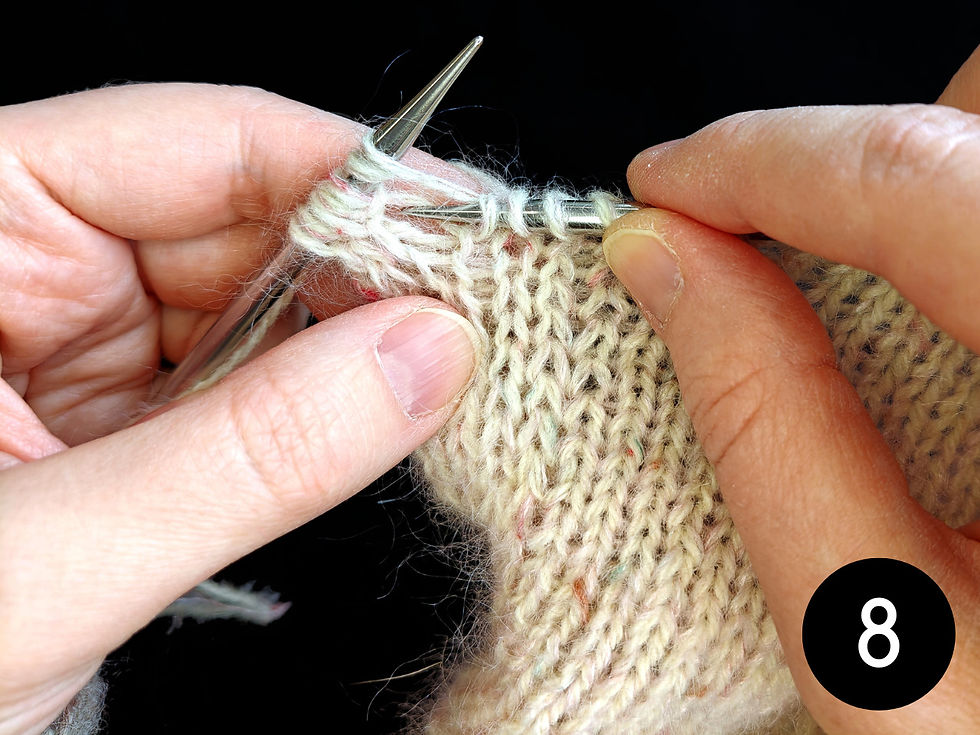
Step 8. This is the step you need to pay the most attention to: insert the needle tip into the large hole under the yarnover strands from Rows 1 and 2. Be sure to catch both strands!

Step 9. Knit the two stitches together, dropping the extra wrap from Row 2.

Step 10. Finally, pass the slipped stitch over to close the buttonhole. This is essentially like doing a slip 1 - knit 2 together - psso (SK2P) left-leaning double decrease... except the stitches you K2tog are the two yarnovers from Rows 1 and 2.
Why Use This Buttonhole Technique?

The finished three-row double-yarnover buttonhole spans two rows vertically and nestles between two stitch columns horizontally. The two knit stitches on either side of it diverge for a while, then meet again before continuing on smoothly. There are no unsightly bars that you usually get when binding off stitches for buttonholes.
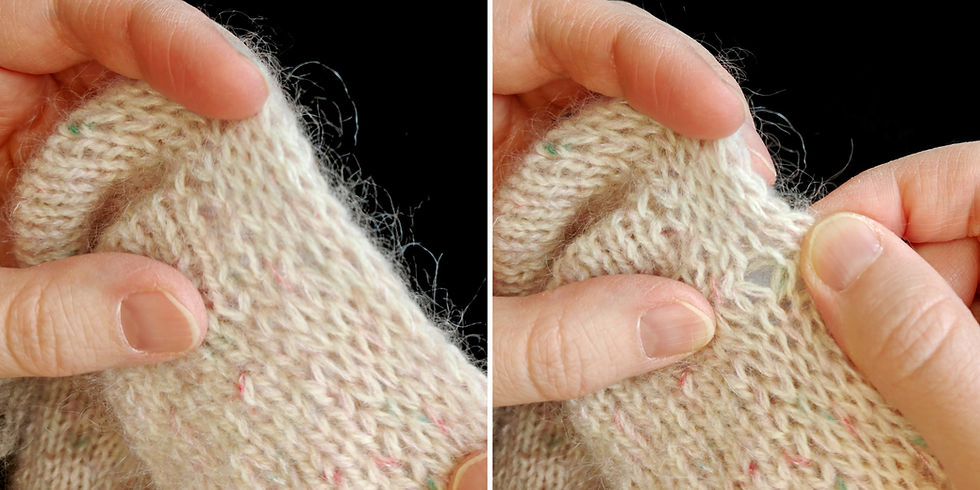
When worked in stockinette — or double knitting like I've done here — these buttonholes are practically invisible. The knit stitches on both sides of the buttonhole close up as if the buttonhole isn't even there. You need to stretch the fabric to even see it.

On the wrong side of the fabric the buttonhole is a bit more visible: there's an elongated stitch that gives it away. But again, only stretching out the fabric really reveals where that buttonhole is.

Give this technique a try the next time you need clean and unnoticeable buttonholes — especially in double knitting! It may feel a bit unusual at first but once it clicks, it's quick, intuitive, and so satisfying to knit.
Pin this post!


![How to Knit One-row Buttonholes in 2x2 Ribbing [TUTORIAL]](https://static.wixstatic.com/media/2a6e85_3242376f9ac94934b675fcea678a96c6~mv2.png/v1/fill/w_735,h_1102,al_c,q_90,enc_avif,quality_auto/2a6e85_3242376f9ac94934b675fcea678a96c6~mv2.png)
![One-row Buttonholes [TUTORIAL]](https://static.wixstatic.com/media/2a6e85_60c96c061eb9442fa01ba4991b64b0bf~mv2.png/v1/fill/w_600,h_900,al_c,q_90,enc_avif,quality_auto/2a6e85_60c96c061eb9442fa01ba4991b64b0bf~mv2.png)


Comments